
OpenVPN Server on Asuswrt-Merlin
Enabling the OpenVPN Server on your router will allow you to access resources hosted on your home network securely from remote locations. It will also provide you with a free VPN connection to your home network for use when on public Wi-Fi. Or, perhaps you are the go-to IT support person for your extended family. Installing OpenVPN on the router will allow to connect securely from wherever you are to perform system maintenance and technical support.
In this article, I’ll show you how to configure:
- Two free services that are required if your Internet Service Provider provides you with a dynamic WAN IP address
- OpenVPN Server on Asuswrt-Merlin 384.4
- OpenVPN Client software on Windows, Android, iOS and Mac OSx operating systems
DDNS
DDNS is the acronym for Dynamic Domain Name System. If your Internet Service Provider (ISP) assigns you a dynamic WAN IP address, you need to use a DDNS service. I use the free DNS-O-Matic service, owned by OpenDNS, to perform this function. I prefer DNS-O-Matic as it will update other services I use with the WAN IP address of my home network whenever it changes. Others provide a similar service. Select the one that works best for you.

In a web browser, go to the DNS-O-Matic web site and select the create a free DNS-O-Matic link to create your account
Create a Username and Password, enter your email address and select a country from the drop down list. Select Create account when finished. Check your inbox for the confirmation email from DNS-O-Matic. Select the link to confirm your sign-up request.
On your web browser, manually key in the wireless router’s default IP address or enter http://router.asus.com.
Navigate to WAN > DDNS.
Enable the DDNS Client: Yes

Configure DNS-O-Matic using the example above. Validate that DDNS is working by navigating to Network Map. If there is an issue, a yellow explanation mark will appear next to the DDNS field in the Internet Status box.
Free DNS Hosting
The next step is to select a DNS hostname service and sign up for an account. The hostname service will give you the ability to create a hostname that will store your WAN IP address. I use the free hostname service yDNS.
Open up a new browser tab and navigate to yDNS.

Select the Get Started button to create an account. You also have the option to login using your Google email, Facebook or GitHub account.
 Once logged in, select the + sign and select the Add Host option.

Select the Domain field and select the Domain name you prefer to use from the drop-down list.

Enter the Name you prefer to use and select Add Host to create the domain name. A web page showing the hostname will now appear. Select and copy the hostname you created.
Go back to DNS-O-Matic browser tab.

Select yDNS from the drop-down list. Paste the hostname in the Domain field.
Return to the yDNS browser tab.

Navigate to the Account > Preferences to obtain the API username and password to finish configuring DNS-O-MATIC.

Select the API tab.
Select and copy the yDNS Username.
On your browser, switch to the DNS-O-Matic tab.
Paste the yDNS Username into the API Username field.
In the browser, switch to the yDNS tab.
Select and copy the Password.
On your browser, switch to the DNS-O-Matic tab.
Paste the Password into the API Password field.
Select and copy the yDNS Username.
On your browser, switch to the DNS-O-Matic tab.
Paste the Password into the API Password field.
Select Update account info.
The WAN IP address should will now appear in the Status column.
Return to the yDNS tab. The hostname should display the WAN IP address if the update process is working properly.
If you have issues, review the previous steps.
Configure the OpenVPN Server
On the Asus router, navigate to VPN > VPN Server.
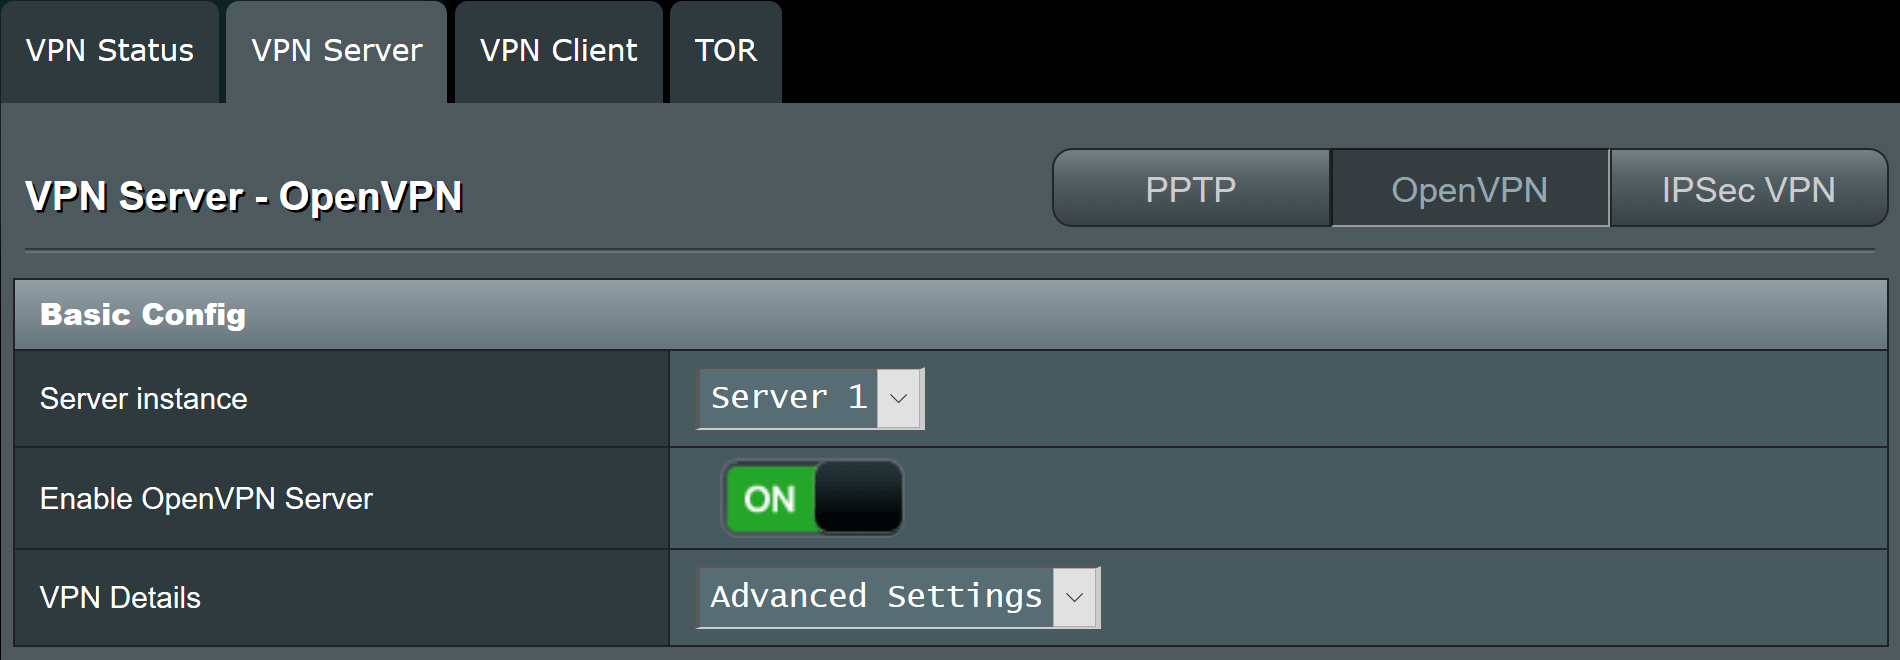
Server Instance: Server 1
Enable OpenVPN Server: ON
VPN Details: Advanced Settings

I recommend you use most of the defaults. However, I prefer to change Direct clients to redirect Internet traffic to No. More on this below. Change Compression from LZ0 to LZ4 as LZ0 is deprecated in OpenVPN 2.4 and will be removed in OpenVPN 2.5. LZ4 generally provides the best performance with the least CPU usage. I have been unable to make the connection work properly when setting Compression to None or Disabled.
Following are the field definitions:
Interface Type
TUN is the preferred method because it works on Windows, iOS, Android and Linux operating systems. TAP cannot be used on Android or iOS operating systems. You can read more about the benefits and drawbacks of TUN and TAP on the OpenVPN Wiki.
Protocol
UDP provides data integrity via a checksum but does not guarantee delivery. TCP provides both data integrity and delivery guarantee by retransmitting until the receiver acknowledges the reception of the packet. Select UDP for best performance.
Push LAN to clients
Allows you to access LAN resources via the OpenVPN tunnel.
Direct clients to redirect Internet Traffic
If the Direct clients to redirect Internet Traffic feature is disabled, the remote OpenVPN client will use their existing WAN connection for all Internet traffic and only use the OpenVPN Server when trying to access a resource on the home network.
If the Direct clients to redirect internet traffic feature is enabled, all remote OpenVPN client traffic will first go via the LAN on the OpenVPN Server and back to the Internet. When you are in coffee shop, this option will route ALL internet traffic to your home router and from there to the internet. In other words, ALL internet traffic will go through the secure tunnel from the coffee shop to the home network.
Respond to DNS
Enable these settings so that OpenVPN Clients will use the DNS of the VPN server. When you type an address in your browser, the DNS of your home router is used to perform domain name resolution and not the DNS of the coffee shop network.
Advertise DNS to clients
Instructs the OpenVPN clients to use the router’s LAN IP address as their DNS server
You can further customize the VPN server by changing the encryption cipher and server port from their default values. The default negotiable ciphers are sufficient encryption for maintaining a proper security when connecting to your Server.

Select Export to download the OpenVPN configuration file.
OpenVPN Client
In this section, I will show you how to install the OpenVPN client on Windows, Android, iOS and Mac OSx platforms.
Windows
Download the OpenVPN client from the OpenVPN download page
Double click on the file to install the OpenVPN software. The default location is “C:\Program Files\OpenVPN”.
In Widows Explorer, open the “C:\Program Files\OpenVPN\config” folder.
Open another Windows Explorer session. Navigate to the Download folder. Copy the client.ovpn file exported from the OpenVPN server to “C:\Program Files\OpenVPN\config” folder.
Open up the file in a text editor.

Update the remote line (4th line in the file). Replace the IP address with the yDNS hostname. Save the file.
Right click the OpenVPN icon on the desktop and click Run as administrator.
The OpenVPN GUI will appear on the windows task bar.
Right click the OpenVPN icon. Select the OpenVPN Configuration file you saved and click Connect.
Enter Username and Password for authentication and select connect.
A confirmation screen will appear if you connect successfully.
Android

Use the Google Play Store to download the OpenVPN app and install it on your device.
Tether your Android device to your computer. Open Windows Explorer and navigate to the SD card. Create a directory called OpenVPNConfigs. Select and copy the client1.ovpn file from your computer to your Android device. I recommend that you rename the file to a name that is more descriptive (e.g. HomeNetwork) if you have more than one location you need to connect to.

Start the OpenVPN app. Select the OVPN Profile option.
Select the ![]() icon at the bottom right hand corner to add a new OVPN Profile.
icon at the bottom right hand corner to add a new OVPN Profile.
Navigate to the OpenVPNConfigs folder. Select the HomeNetwork.ovpn profile from the SD card. A check mark will appear next to the profile. Select IMPORT from the upper right hand corner.
Edit the profile title if necessary. Enter the Username. Check the Save password box and enter the Password. Select Done when finished on the keyboard. Select ADD from the upper right hand corner.

5.2.7 Press the toggle button establish the connection.

5.2.8 Select OK to grant permission.

Select CONTINUE.

You should now have a connection established to the OpenVPN server.
iOS
Download OpenVPN app from the Apple itunes store onto your iPad or iphone.
Next, connect your iPad to iTunes on your computer.

5.3.3 Click the iPad icon

Select File Sharing.

Select the OpenVPN App. Select Add File… at the bottom of the OpenVPN Documents box.
Locate the folder of the OpenVPN config file. Click Open.

On your iPad, you will now see the Profile. Select the green + icon to import the profile.

Select the profile. Enter your User ID and Password. Select the Save toggle button to save the User ID and Password. Toggle the Connection button to establish the connection.
Mac OSx
Tunnelblick is a popular free OpenVPN software for OS X and macOS.
Download the Tunnelblick file to your Mac.
Use Finder to locate the file. Double-click on the file name. A Tunnelblick box will appear.
Double-click the Tunnelblick icon.
Select Open. Enter your Mac OSx Username and Password to confirm the installation. Wait for the installation to complete.
In Finder, select Applications. Locate the Tunnelblick application and double-click.

Select the + sign in the bottom left hand corner of the Configuration panel. A pop-up will appear with instructions. Acknowledge by pressing the OK button.

In Finder, select the OpenVPN configuration file. Drag and drop the configuration file to the Tunnelblick Configurations pane.
To connect, highlight the file and select Connect. Enter the Username and Password when prompted.
In the blog document for OpenVPN Server on Asuswrt-merlin when you mention compression, you said “Change the Compression from LZ4 to LZ0 as LZ0 is deprecated in OpenVPN 2.4” should that be instead “Change the Compression from LZ0 to LZ4 as LZ0 is deprecated in OpenVPN 2.4” ?
Great Blog by the way!
-HardCat
Thanks for catching the typo. I updated the blog post.